C. Admin - Add new users
Jump to:
No content available.
Welcome!
This manual helps you to optimise the usage of Cloudya, the cloud telephone system by NFON.
We hope you enjoy working with Cloudya!
Subject to alterations
Version 3 / 09/2025 (EN)
Please find the latest release notes here.
| Type | Icon/Character | Description |
| NOTE
CAUTION
WARNING | NOTE: Information that is useful but not critical to the reader.
CAUTION: Tells the reader to proceed with caution.
WARNING: Stronger than CAUTION; means "don't do this" or that this step could be irreversible, e.g., result in permanent data loss. | |
| TIP |
| Useful tips that provide additional information. |
| Procedure | 1. 2. 3. | Procedures are numbered steps to perform an action, where the order of the steps is relevant. |
| Result of procedure/action | ⇒ | Indicates the result of an action//procedure. |
| Lists | • • | Used for listings and items where the order of steps is irrelevant. |
No content available.
Download and Install for Microsoft Windows
- Open the download page.
- Download the preferred desktop app of the list.
⇒ The installer comes in a ZIP file. - Open the ZIP file and run the embedded installer.
⇒ The app can be found on your desktop once the installation has been completed.
Download and Install for macOS
- Open the download page.
- Download the preferred desktop app of the list.
⇒ The installer comes in a ZIP file. - Open the ZIP file and extract the DMG file.
- Move the DMG file to your application folder.
For the installation of the Desktop App please open the Setup.exe file.
After your account has been created, you will receive an email with a request to define a password. Please define it and use it to log in.
You can enable Cloudya Desktop app to auto start on system startup.
To enable it for Mac OS:
1. Start Cloudya Desktop app.
2. Right-click on the Cloudya Desktop App icon in the dock.
3. Select Options > Open at Login.
To enable it for Windows:
Follow the steps described at https://support.microsoft.com/en-us/windows/add-an-app-to-run-automatically-at-startup-in-windows-10-150da165-dcd9-7230-517b-cf3c295d89dd.
Login
To use the app
- Double-click on the desktop shortcut
- Enter your username (this is your e-mail address) and password.
- Click on Login.
Upon your first login, you'll be prompted to grant permission to the app to access your microphone and camera.
Once you are logged in, you will see the start screen of the app.

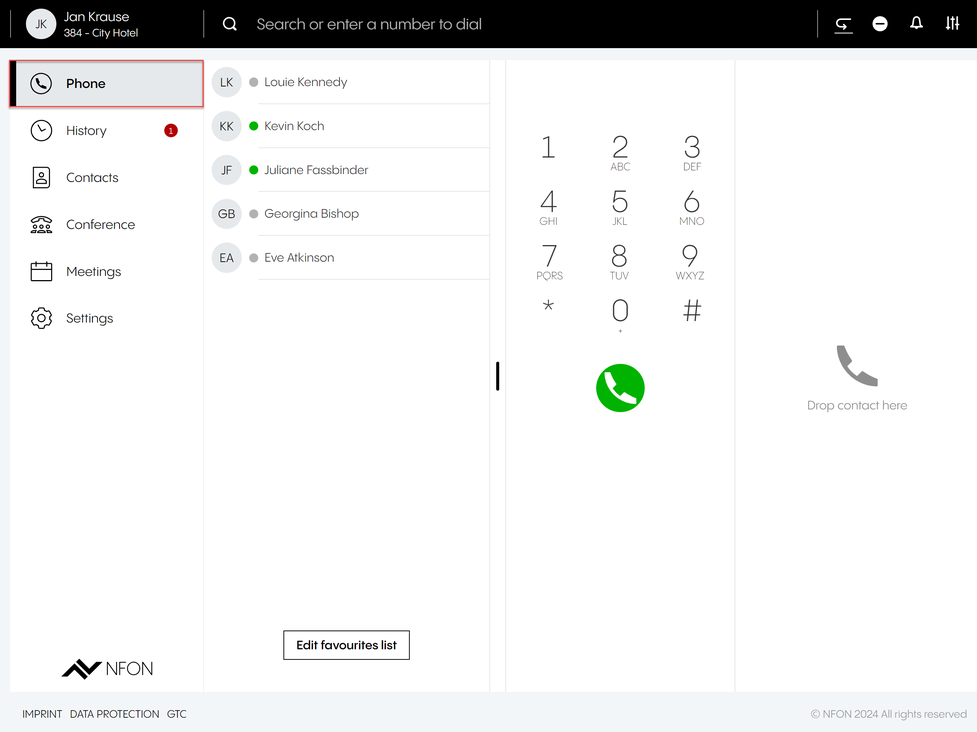
App overview
The app is divided into 5 major sections:
- App menu in the top left corner
- Search bar on the top
- Telephone menu on the left side
- Favourite list (your BLF keys)*
- Telephone / Dial field

*The favourite list is a list of the BLF keys from your device. In case you did not set any BLF keys or the user is new, this field will remain empty.
App menu
In this section, you can:
- Log in and log out from the app.
- Select or add a device using the Call with function.
- Access External numbers/DDI.
- Activate or deactivate the Show help tooltips function.
You can make calls using the app, your extension (e.g. your desktop phone) or another device, such as your mobile phone. This feature is called Click to Dial (C2D). Just select the device you want to make a call with, and all your calls will go through that device.
When the app menu is closed, you can see your name and the device you are calling with in the top-left corner.

Per default, the app is set as your primary device - the target you will call with. This means, once you have an incoming call, your app will ring. In case you want to change this, select a different device.
Adding a new device to call with
- Click on Call with.
- Click on +Add.
⇒ An input field opens up. - Enter a name and telephone number for the external number, e.g. Hotel.
- Click on Add.
⇒ Your recently added number appears on the list.

Making a call with a newly added number
- Click on the entry.
⇒ The new device (here, the hotel room phone) is now selected as the device to make calls with. - Dial the number you would like to call.
⇒ The selected device (here, the hotel room phone) will ring. - Accept the call.
⇒ The call to the number you have dialled initially is now initiated from the selected device.

Search bar
The search bar is used to browse contacts, extensions, conferences, meetings and groups. Search results are clustered into these categories.
To search:
- Type in the name you are looking for.
- Select the respective category to be able to receive the relevant search results.
Next to the Search bar, you will find some shortcuts to the following features:

| Call Forwarding: Select the call forwarding profile you wish to activate | |
| DND: Activate or deactivate the Do not disturb function | |
| Ringtone Settings: If your ringtone is off, the app will not ring and you will only see a notification | |
| Device Settings:
|
Individual icons may not be visible for you in case you did not configure the actual setting.
Telephone menu
Here you will find the following features:
Phone
In this section, you can
- Make calls (for more information on how to make calls, see Telephone - how to make calls)
- See the favourites list
- Click on Edit favourites list to go to Settings and access Function keys here
- Use the dial field to enter a phone number or a PIN
History
In this section, you can see your recent events, i.e. incoming, outgoing and missed calls, conferences and meetings that you have attended, as well as access your voicemails.
In the Calls tab, click on the information icon to:
- Delete an event
- Get information about the event type
- Copy to clipboard

Contacts
In this section, you can access all your contacts in alphabetic order.
There are several options to call a contact:
- Double-click on an entry
- Right-click on an entry to select from several call options.
To select from several call options:
- Hover over the entry.
- Click on the Information icon.
- Right-click on the phone number.
- Choose the device you want to call with.
When right-clicking on an entry, you also can:
- Add a contact to a function key
- Add a number to contacts

| Filter your contacts into global and private contacts | |
| Delete particular contacts Please note that you are only able to delete your local contacts. If a contact has been added by your admin, you will not be able to delete it. | |
| Add a new private contact |
Settings
In this section, you can access the following features:
- User settings
- Call forwarding
- Queues
- Function keys
- Fax
- Download
- Info
For more information, go to Settings.

Please note that fax settings from Ncontrol are not synchronised with the web app.
Favourite list
The favourite list is a list of function keys e.g. speed dials or busy lamp fields set on your extension.
For example, you can save telephone numbers that you call most frequently to your favourite list.
- Click on Edit favourite list.
- Then click on the plus button and enter the telephone number and the name.
- Save the entry.
The entry now appears in the favourite list.
In case there are already function keys set for your extension (e.g.to your desktop phone), they will appear here in your favourite list.

This is your virtual BLF list.
- See who is talking
- Drag & drop the number directly from the favourite list to initiate the call
Telephone / dial field
- Dial here the telephone number you wish to call
- Use the DTMF field to enter the telephone number you wish to call or to enter conference room PINs
Data processing of private phone book entries
In the event of private use of the phone system, the employees are to be informed in an appropriate manner about the data processing of private phone book entries or the individual assignment of favourites / function keys. In various application scenarios, this personal information can be processed within the telephone system use/administration, during technical and operational operation, including troubleshooting or holiday substitution and substitution in case of illness, during the optimisation and during law enforcement scenarios. A distinction between business and private information cannot be made technically, or only to a limited extent.
Making a call
There are several options to initiate a call:
- Type in a name of a contact, extension, conference, group or meeting into the Search field and double-click on it
- Double-click on on a contact, extension, conference, group or meeting
- Make a call from Contacts, see Contacts
- Drag & drop a number or contact to the area on the right or
- Use the dial pad to enter a phone number

Please be aware that not all number formats will work as intended. Therefore we always recommend the international standard, e.g.: +49 152 2881738 or +44 163 2960201
If one of your contacts uses the national number format (e.g.: 0171 39200 12) it will work as long as you stay in the same national telephone network as the target. But if you would try a call from aboard, it will connect to the national telephone network of your current location.
Your call status is visible at the top of the screen. When in a call, a green line indicating the phone number you are in a call with and your talking time will appear.
Incoming call
In case of an incoming call, a pop-up with caller information, e.g. phone number, extension or name appears.
When you receive an incoming call, you can:
- Accept the call
- Decline the call
- Send the call to the voicemail
- Transfer the call

Browser notifications for incoming calls
You will be notified on incoming calls when the browser window is minimised or you are currently on another tab.
Holding a call
To put a call on hold, click on the Hold button .
.

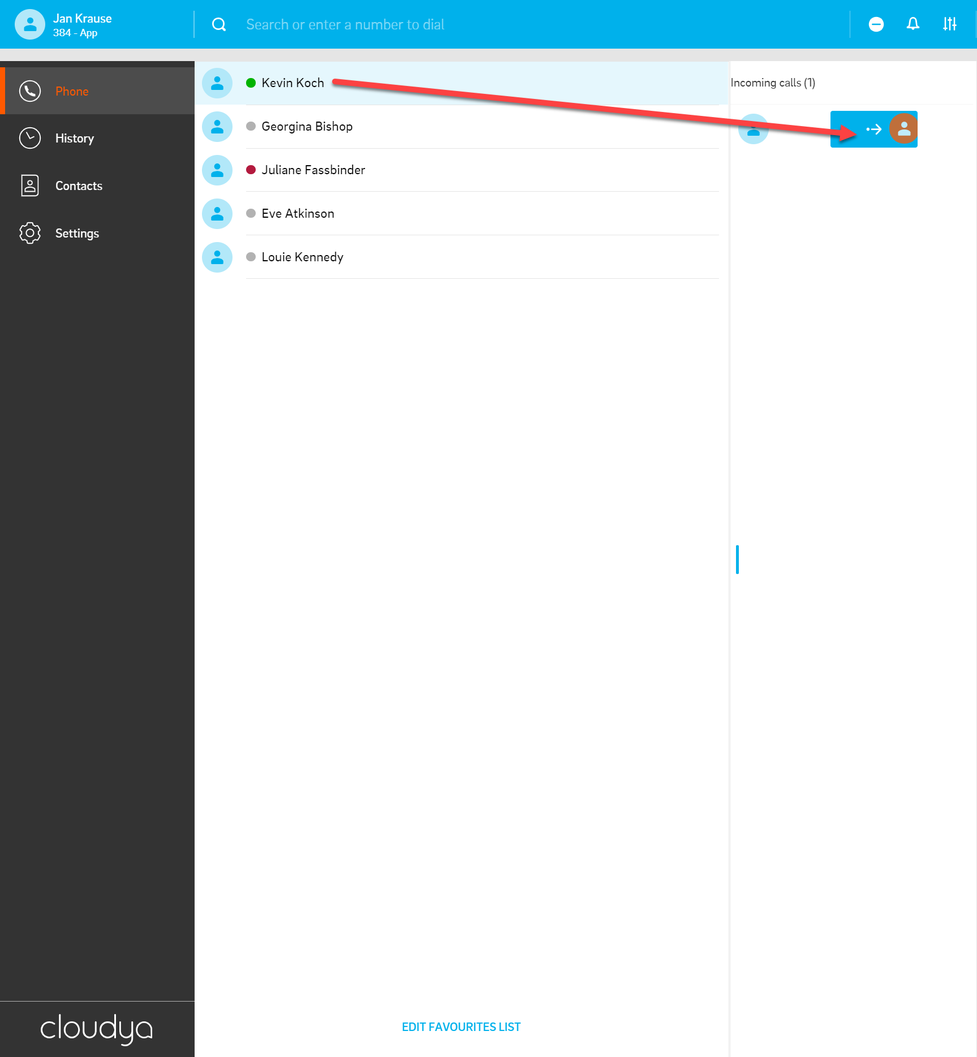
If you have a second incoming call, you can:
- Accept the second call.
⇒ The first call is put on hold automatically. - Deflect the call to the voicemail.
- Decline the call.
- Transfer the call.
You can also put both calls on hold at the same time:
- Click on the Hold button.
⇒ All calls are now on hold.

Your call status is visible at the top of the screen. If all calls are on hold, a yellow line indicating your status will appear.
Swapping a call
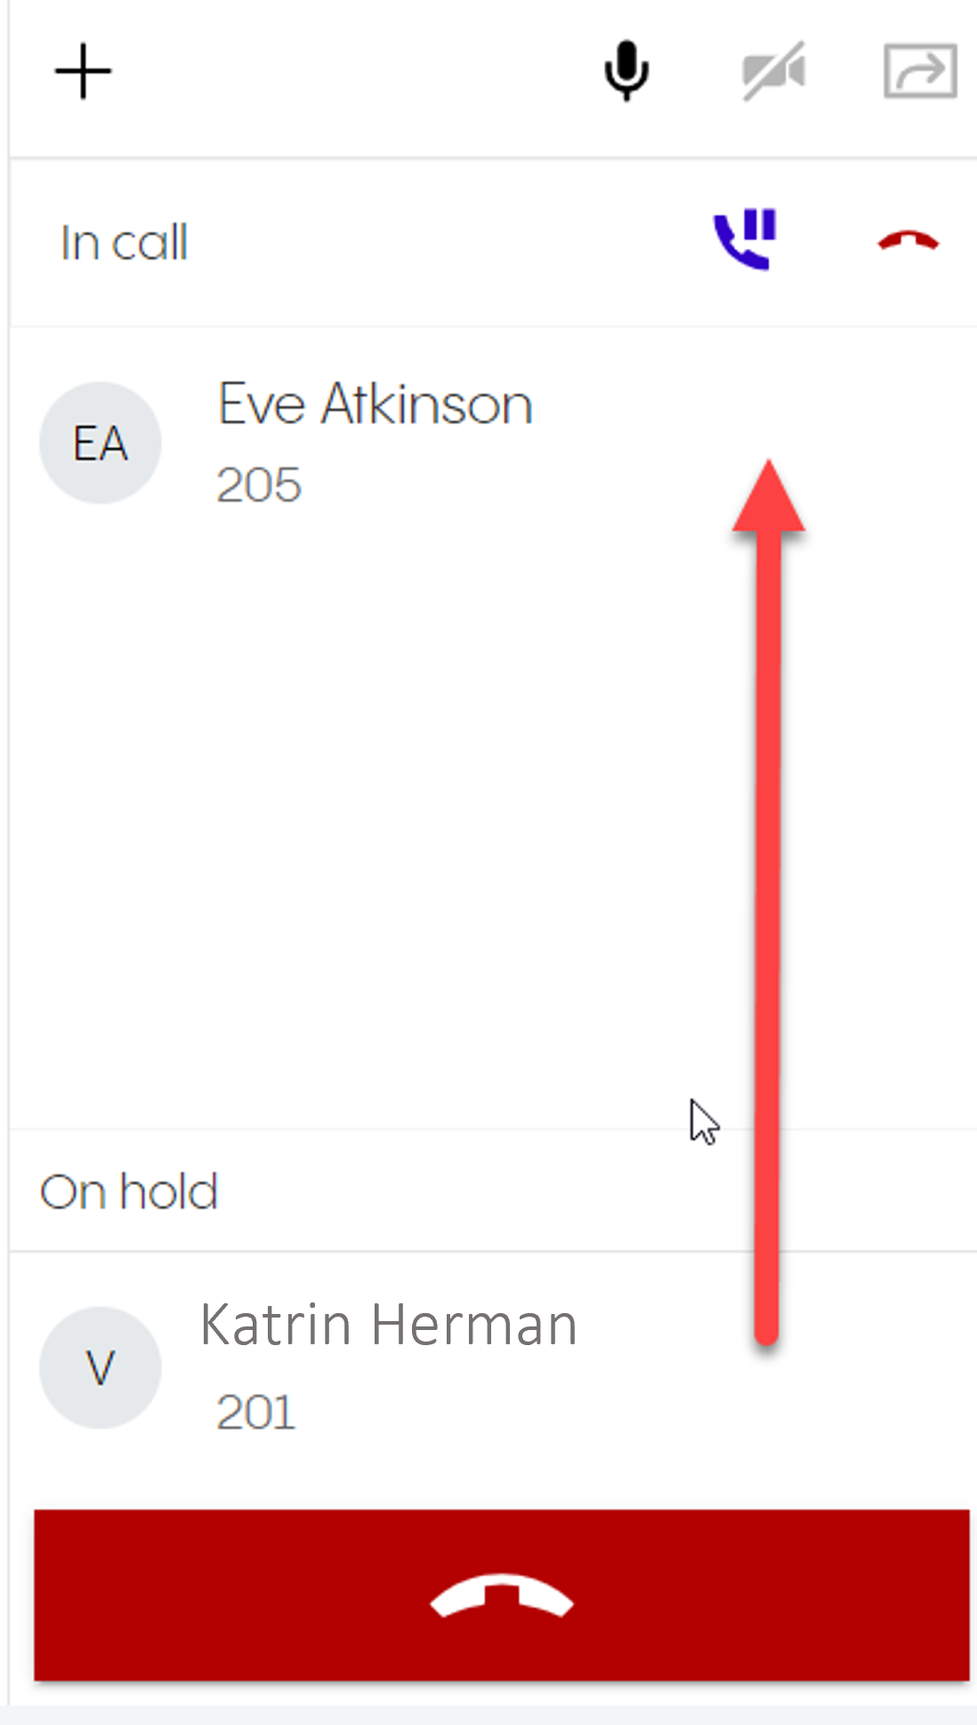
Call swapping is a change between an active call and one or more calls on hold.
- Click on the phone number that is currently on hold and swap the calls.
⇒ You will see the active call in the green banner at the top of the screen and in the phone section as In call.

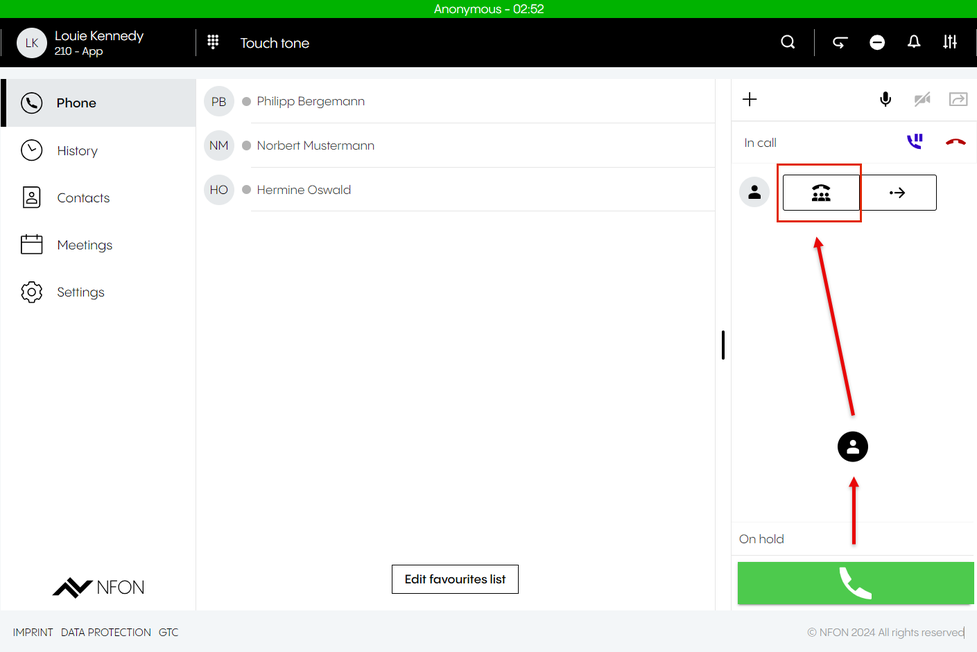
Starting a three-way conference
While you have an active call and one call on hold, you can add both calls to a three-way conference.
- Drag the call on hold per drag&drop towards the active call.
⇒When you start to drag the call on hold, the icon for the three-way conference appears. - Drop the call on the Conference icon.
⇒ The three-way conference will start.
Call Transfer
Interactive Blind Transfer
When you are in a call with someone and want to transfer the call to another person without asking the latter if the transfer is possible:
1. Select a name from your favorites list/phone book or type in the search field.
2. Drag and drop the selected name to ![]() .
.

5. Transfer the first call to the second call by dragging and dropping the second call to ![]() .
.
Switching to a video call
When you are in an active audio call, you can switch to a video call. You can see the video call button (camera icon which is crossed out) in the top right-hand corner.
- Hover over the video call button.
⇒ The tooltip Activate video will appear. - Click on the video call button.
⇒Once the video has been activated, the video call button changes to a video camera icon.
⇒If you now hover over the active video call button, the tooltip Deactivate video will appear.

Note that the video is automatically deactivated for both parties when starting a dynamic conference or when the call is put on hold.
The video is also automatically deactivated when switching to screensharing. You will have to press the video call button to switch to a video call.
If both parties have activated their video by clicking on the video call button, you can see the following:
- your own video in a small window (2),
- the video of the other party in the larger window (1) (if the other party has not activated the video, the larger area is grey).

Starting cinema mode
Click on the Cinema mode button to activate the cinema mode.
⇒You can see the video of the other party in cinema mode, and your own video in the top right-hand corner.
In the cinema mode, you can:
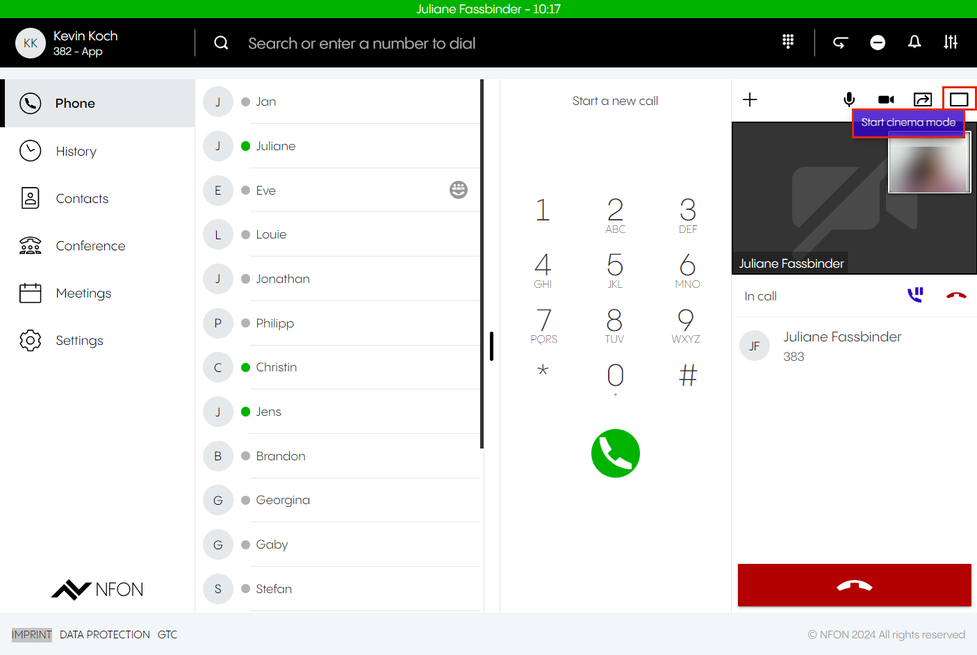
| End cinema mode To end the cinema mode, press this button or the Esc key. | |
| Change to fullscreen To end the fullscreen mode, press the Exit fullscreen button or the Esc key. | |
| Go to Call settings | |
| Pin the video of other party |
Function availability
Please note that the function is currently in public beta.
When you are in an active audio or video call, you can switch to screensharing. You can see the screen sharing button ![]() in the top right-hand corner. When hovering over the button, you can see the tooltip "Start sharing your screen".
in the top right-hand corner. When hovering over the button, you can see the tooltip "Start sharing your screen".
Start sharing your screen by clicking on the screen sharing button ![]() .
.

Note that the selection dialogue is part of your browser and does not follow Cloudya language user settings but corresponds to your Chrome language settings.
The screen sharing has been activated.
- If you have opted to share a Chrome tab, the message Sharing [website name] to start.cloudya.com appears at the top.
Click on Stop sharing to stop sharing your screen. - If you have opted to share a window or your entire screen, at the bottom of your screen you can see the snack bar Start.cloudya.com is sharing a window or Start.cloudya.com is sharing your screen.
Click on Stop sharing to stop sharing your screen.
Click on Hide to remove this information from your screen.

Change What You are Sharing or Stop Sharing
To change what you are sharing, click on the screen sharing button ![]() .
.

Interactive Attended Transfer
When you are in a call with someone and you want to transfer the call to another person and you talk to this person first and he/she decides whether to accept the call or not:
- Select a name from your favourites list/phone book or type it in a search field.
- Put the first call on hold.
- Call the second person while the first call is on hold.
- Transfer the held call to the active cal via drag&drop.
⇒The transfer has been successful if the snack bar at the bottom of the screen displays Call forwarding successful.

4. Transfer the first call to the second call by dragging and dropping the second call to ![]() .
.
Non-Interactive Blind Transfer
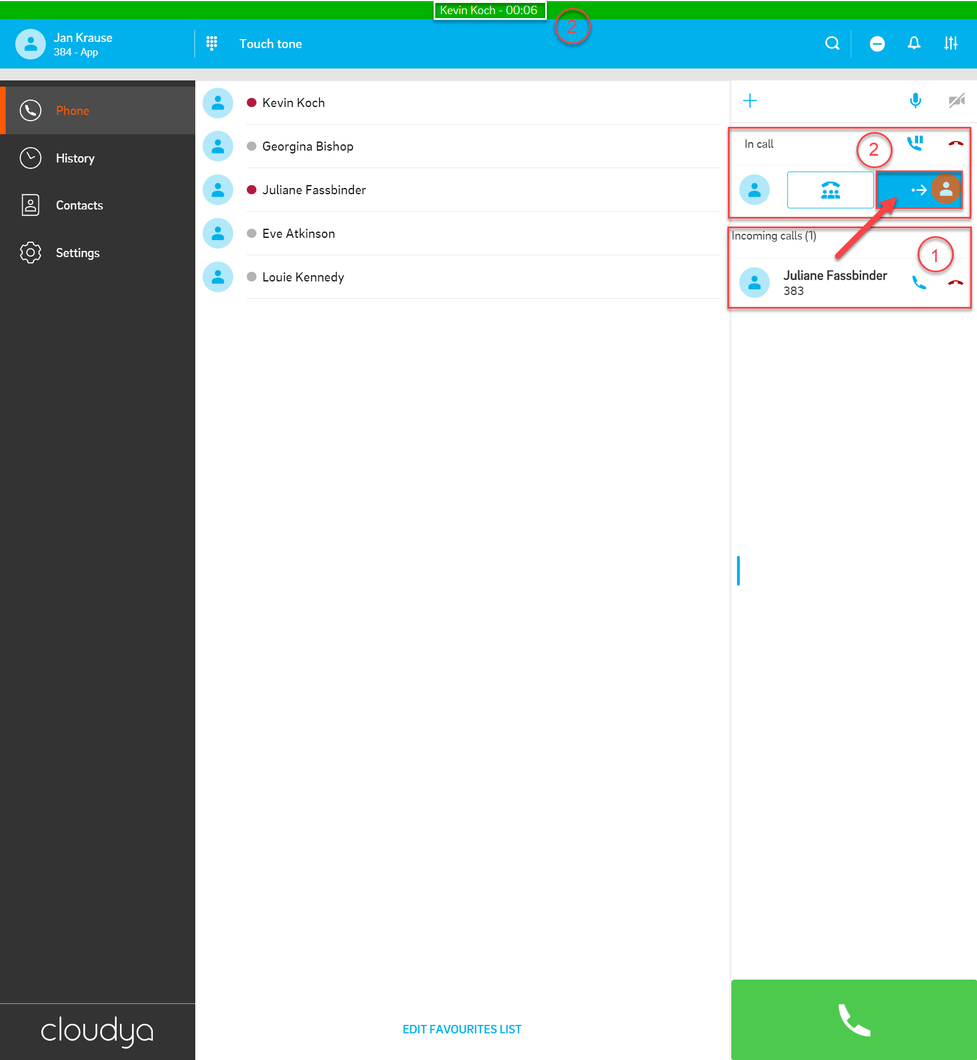
When someone is calling you and you do not want to take the call but to to transfer the call to another person without asking this person if the transfer is possible:
- Click on the Transfer button next to the caller name.
⇒An entry field Forward call to appears. - Start typing the name of the person you want to forward the call to.
⇒The full name appears below. - Click on the name.
⇒The transfer has been successful if the snack bar at the bottom of the screen displays Call forwarded to [name of the person].

2. Select a name from your favorites list/phone book or type in a search field.
3. Transfer the first call to the second call by dragging and dropping the second call to ![]() .
.
Settings
Here you will find all app parameters.
The settings are clustered into seven sections:
- User
- Call forwarding
- Queues
- Function keys
- Fax
- Download
- Info

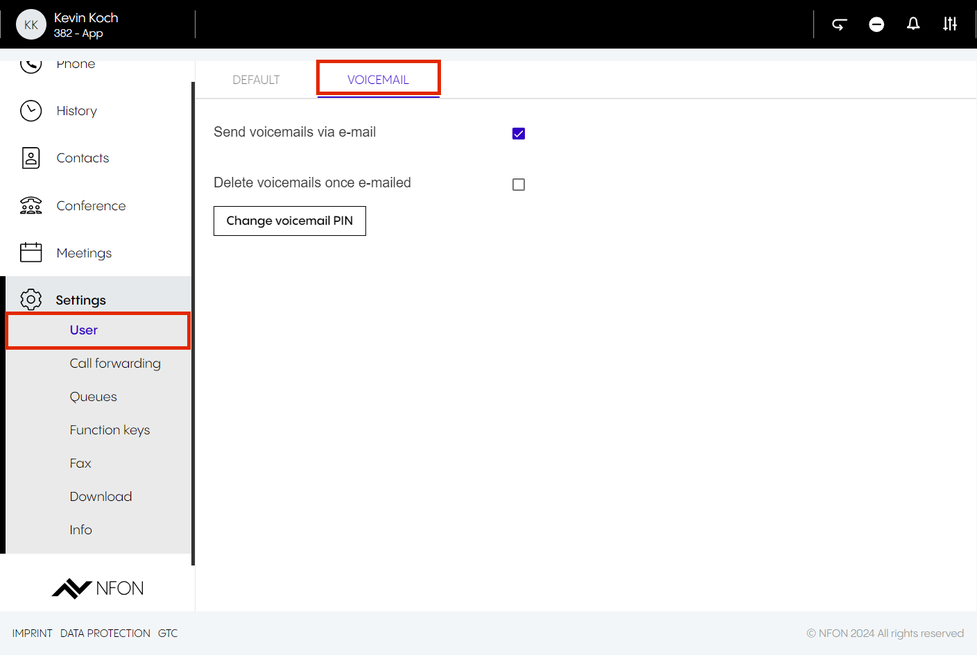
User
The User section consists of two tabs, Default and Voicemail.
In the Default tab, you can
- Change your username (email address)
- Change your password
- Select your Primary device
You can select a primary device from a preconfigured list of devices set by your administrator, e.g. web app, mobile app, desktop phone etc. If you are part of a skill or a queue, you will receive the calls on your primary device only. - Select your app language
- Activate/deactivate welcome sound which will be heard upon starting the app
- Activate/deactivate Call waiting indication
Call waiting indication is deactivated by default. This means that if you in a call, you will not be notified of another incoming call. If, on the other hand, call waiting is activated, you will be informed of another incoming call – usually by a short acoustic signal consisting of two short, rapid successive tones. In this case, the caller does not receive a busy signal, but hears the regular dial tone. - Activate/deactivate the Intercom function
The intercom function is deactivated by default. When your device is marked as intercome and selected as a primary device, a caller can use the star code *80 + the number of your extension to be directly put through to you without your phone ringing. - Activate/deactivate Parallel ringing
Parallel ringing is deactivated by default. If it is activated, you can select an extension name or a phone number and save the selection. When you receive a call, both your extension and the extension/phone number you have added will ring.

In the Voicemail tab, you can
- Activate/deactivate the option Send voicemails via e-mail
- Activate/deactivate the option Delete voicemails once e-mailed
- Change your voicemail PIN
Call forwarding
Set call forwarding parameters.
For more details, see the chapter Call forwarding.

Queues
In this section, you can configure and manage queues.
Call queueing allows calls to be placed on hold without handling the actual enquiries or transferring callers to the desired party. While in a call queue, the caller is played pre-recorded music or messages. Call queues are often used in call centres when there are not enough employees to handle a large number of calls. Call centre operators generally receive information about the number of callers in the call queue and the duration of the waiting time. This allows them to respond flexibly to peak demand by deploying extra call centre staff.
To add a queue:
- Click on the + icon in the top right-hand corner.
⇒A pop-up to add a queue appears. - Search for the name of the queue.
⇒A drop-down list with queues appears. - Select a queue.
- Click on Save.
⇒The queue has been added to your list.
To log out of a queue:
- Hover over a queue.
⇒The Log out of the queue button appears on the left. - Clck on this button to log out of the queue.

Adding a function key
In this section, you can add function keys for quick access in your Favourites list.
- Click on the + button in the top right-hand corner.
⇒A new window opens. - Under Key, select a number to define where your function key will appear in your list.
- Under Name, assing a name to your function key.
- Under Type, select the type of a function key.
- Under Target, enter an extension number, a contact name or a function code.
Should you opt for a function code, make sure to enter it in the right format, i.e. * + number, e.g. *80. - Click on Save.
⇒The new function key has been added and is shown in your list.

In the event of private use of the telephone system, the employees are to be informed in an appropriate manner about the data processing of private telephone book entries or the individual assignment of favourites / function keys. In various application scenarios, this personal information can be processed within the telephone system use/administration, during technical and operational operation, including troubleshooting or holiday substitution and substitution in case of illness, during the optimisation and during law enforcement. A distinction between business and private information cannot be made technically, or only to a limited extent.
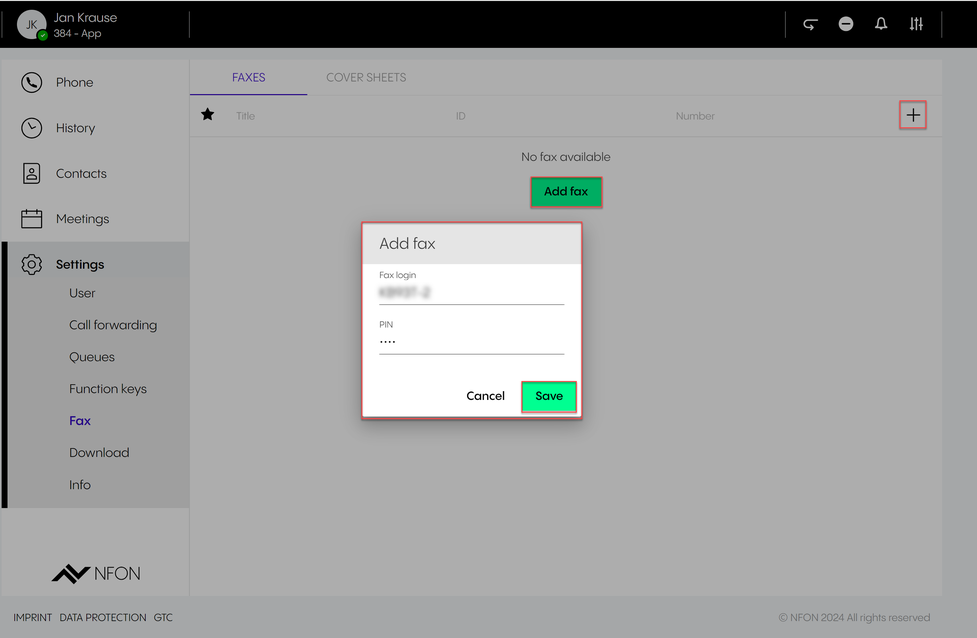
Fax
If you have a fax extension, you can connect it to your app to send and receive faxes. Please note that this has to be set up by your administrator.
To connect your extension, you will need your fax login and PIN. You will receive the data from your administrator.
Adding a fax
- Click on Add fax or the + button.
⇒A new window appears. - Enter your fax login and PIN.
- Click on Save.
⇒The fax is added to your list.
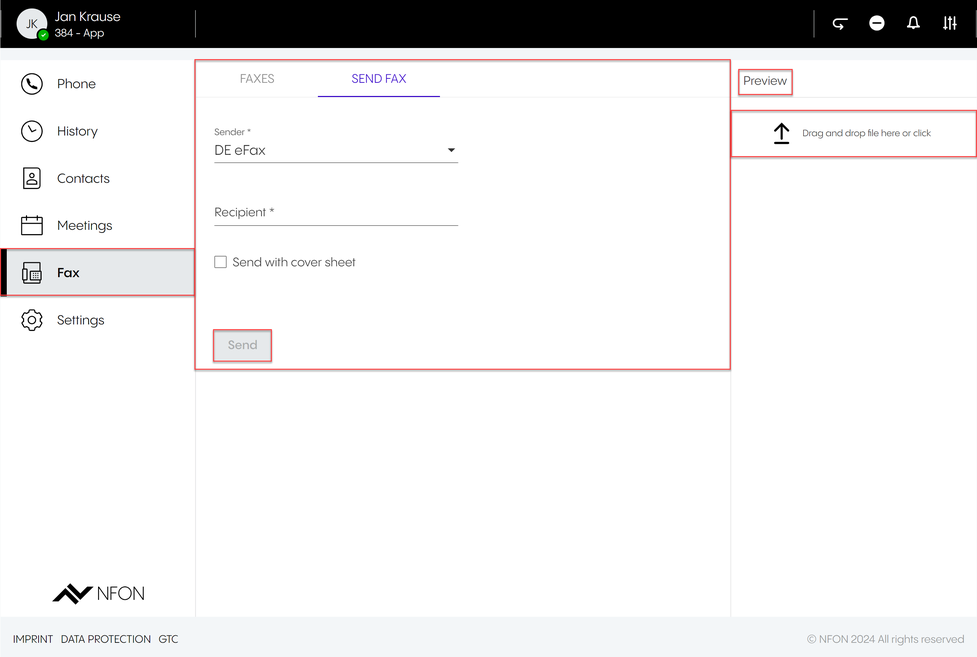
Sending a fax
Once the fax extension has been added, the fax feature will appear in the menu on the left.
In this section, you can:
- See your fax history
- Send faxes
To send a fax:
- Select an eFax name from the drop-down menu, if you have more than one fax extension added.
- Enter a number you want to send the fax to.
- Tick Send with cover sheet if you want to attach a cover sheet to your fax.
- Drag&drop a PDF file you want to send.
⇒The preview will show your file. - Click on Send.
⇒Adding fax to queue is displayed in the snack bar at the bottom of the screen. The fax has been sent.
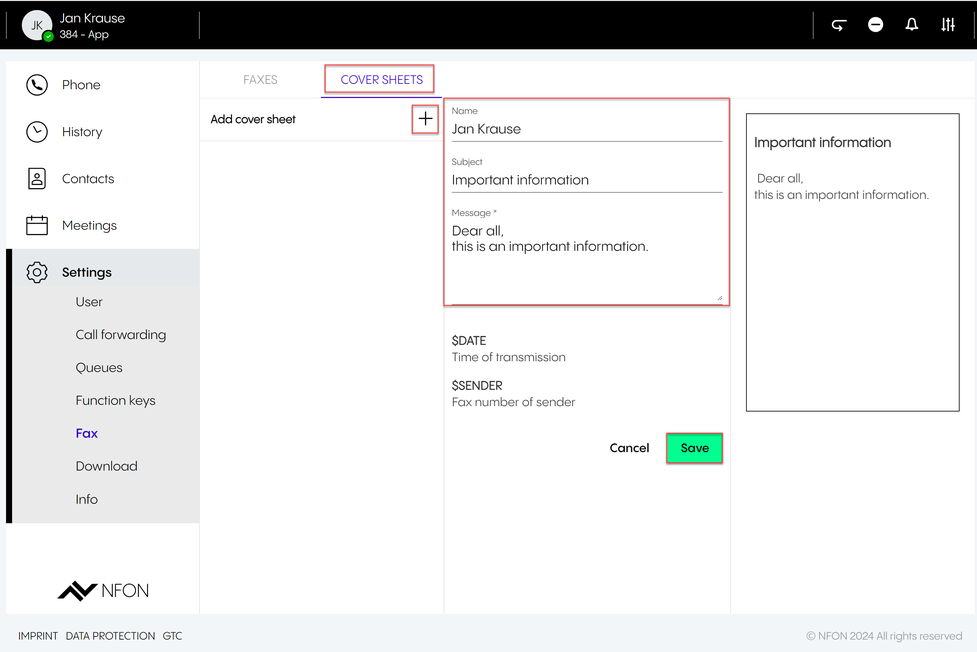
Adding a fax cover sheet
To add a fax cover sheet:
- Click on the + button next to the Add cover sheet.
- Enter the name, sibject and the message of your fax. The preview of your fax is shown on the right. Please note that the date and sender are added automatically.
- Click on Save.
⇒The cover sheet has been added to your list.
Please note that it is not possible to send encrypted PDF files or PDF files with editable fields as a fax via the desktop app.
PDF is password-protected
If a PDF file is password-protected:
1. Open the PDF file in Acrobat Reader.
2. Go to File > Properties > Security.
3. Check under Document Security whether the PDF is password-protected.
Page Extraction is not allowed
If page extraction is not allowed:
1. Open the PDF file in Acrobat Reader.
2. Go to File > Properties > Security.
3. Check Page Extraction
→ If it says Not Allowed, the setting was set automatically when the PDF file was created.
4. Generate the PDF file again, if necessary.
PDF files with editable fields
If a PDF file has editable fields:
Print the file as a PDF file.
→ You will receive a PDF file that cannot be edited.
→ You can send the file now.
Download
In this section, you will find the current version of the Desktop Apps for Windows and macOS for download:

Info
in this section, you will find more information on the app:
- Current app version
- Imprint
- Data protection
- GTC

With call forwarding, you can forward your calls to a specific destination depending on a chosen scenario. You can create your personalised profiles for certain scenarios, e.g. "Vacation", and set a target phone number to which calls can be forwarded to.
Each user has an automatically set call forwarding profile – the default profile – with the following properties:
- It is active per default
- It cannot be deleted
- Call forwarding destination can be edited
- It does not have source-based call forwarding

Up to 10 call forwarding profiles are available per extension.
The user can create up to 9 additional call forwarding profiles.
Creating a profile
- Click on the + button in the Profiles tab.
⇒A pop-up window to create a profile appears. - Define the title and the number of the profile. Furthermore, you can add a colour to your call forwarding profile.
- Click on Create.
⇒The new call forwarding profile has been added.

- Define a title and the profile number for your profile. You can also define a colour for your profile.

Selecting and activating a profile
To select a profile, tick the circle next to the call forwarding profile.
⇒The circle has a blue dot inside it, which means that the profile has been selected.
To activate a profile, go to the destination section and make your call forwarding selection.

To use a call forwarding profile, you need to select it. Otherwise, the default profile or another profile you have previously selected will be active.
Editing a profile
You have created a profile "Vacation". To define exactly what this profile should do, you can either activate one of the call forwarding conditions
- Always
- Busy
- No answer
- Not registered
or you can set a rule and use source-based call forwarding (for more information, see Source-based call forwarding).

Activate profile
- In order to activate a profile, click on the blue dot next to the profile name.

If you want to use this profile, you need to activate it. Otherwise, the basic profile or another profile you have chosen, will be active!
Call forwarding conditions
There are four call forwarding conditions, Always, Busy, No answer and Not registered.
- Select a call forwarding condition.
- Select a call forwarding destination via the Destination dropdown below the call forwarding condition. You can select between three options, Voicemail, Busy and Phone number.
What do the call forwarding conditions mean:
- Always
The call will always be forwarded. The caller will be forwarded directly to the defined destination.
Please note that if this forwarding condition is active, it will influence the call destination on Global DND. That means that Global DND will have the same call forwarding destination as defined here.
- Busy
The call will be forwarded if your extension is busy. The caller receives a busy signal and will then be forwarded to the defined destination.
Please note that if this forwarding condition is active, it will influence the call destination on Global DND. That means that Global DND will have the same call forwarding destination as defined here.
- No answer
The call will be forwarded if you do not answer within a defined time limit. The caller receives a waiting signal and will then be forwarded to the defined destination.
The time limit can be set to 5, 10, 15 or 20 seconds by clicking on the number dropdown.
- Not registered
The call wil be forwarded if your device is not registered on PBX (e.g. broken cable etc.). All incoming calls will be forwarded to a defined destination.

Duplicate profile
- Click on the duplicate button
 .
.
⇒ The pop-up window will appear. - Select a profile you would like to duplicate.
- Enter a new profile title.
- Choose a profile number.
- Click Save.
⇒The new profile will appear in the list.
 .
.
Star codes (DTMF)
The star code for the activation of call forwarding profiles is *10 (followed by the profile number of the call forwarding profile. Find the profile number on the administration portal).
- e.g. to activate profile number 3, please dial *103.
By using star codes you can also activate dedicated call forwarding rules like *11NUMBER. If you do so, this rule will always be set for the default profile independently from which profile is active right now.
However, you will automatically activate the default profile, if you switch on a call forwarding rule via the star code.
- e.g.:
- You have 3 profiles.
- The active profile is profile #2
- Dial *110049892343123
- The rule ”always forward calls to 0049892343123“ will be set and the default profile will be activated.
Please note that the Conference tab is not available in the menu by default.

Please note that the Conference tab is not visible in the menu on the left by default, unless you have subscribed to a conference.
In order to subscribe to a conference, you need to know the conference name or extension number and the conference PIN.
This information is to be found in your conference invitation.
Joining a conference
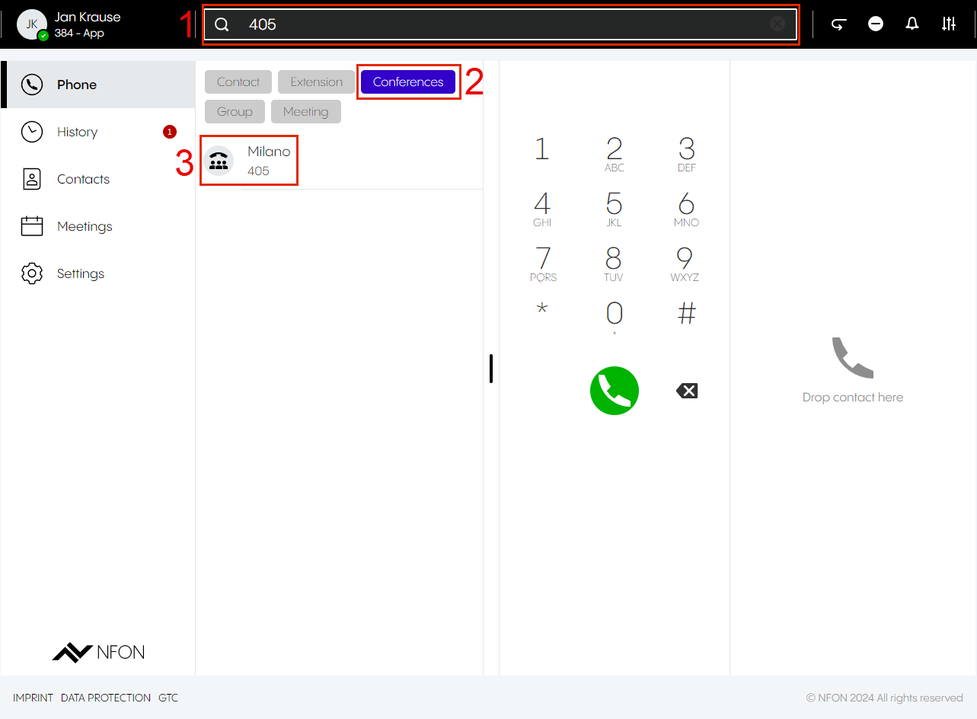
To join a conference that you have not subscribed to, you need to know the conference name or the extension number, and the conference PIN.
- Enter the conference name or extension number in the search bar.
- Click on Conferences.
- Double-click on the conference or press Enter to join the conference.
⇒ You will be asked to enter the conference PIN. - Enter the conference PIN.
⇒ You have now joined the conference.
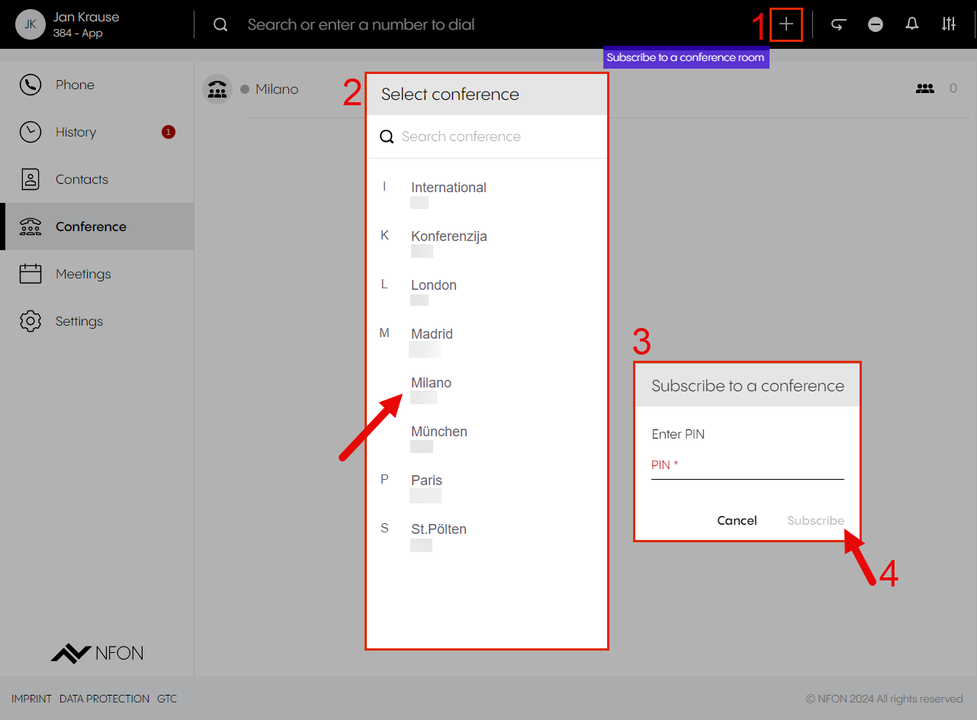
Subscribing to a conference for the first time
- Enter the conference name or extension in the search bar.
⇒ You will see results in the active search, grouped by type and in alphabetic order. - Click Conferences.
- Click on the + button next to the name of the conference.
⇒ A pop-up window will open. - Enter the conference PIN.
- Click on Subscribe.
⇒ If it is the first time you have subscribed to a conference, the Conference tab will appear in the menu.

Subscribing to a conference from the conference menu
To subscribe to a conference from the Conference menu
- Click on the + button.
⇒ The search results will appear in alphabetic order. - Click a conference you would like to subscribe to.
⇒ A pop-up window will open. - Enter the conference PIN.
- Click on Subscribe.
Showing conference information
Hover over the conference.
⇒ The conference icons are visible:

| Conference information | |
| Go to conference | |
| Number of participants |
Conference features
In a conference, a host and participants can:
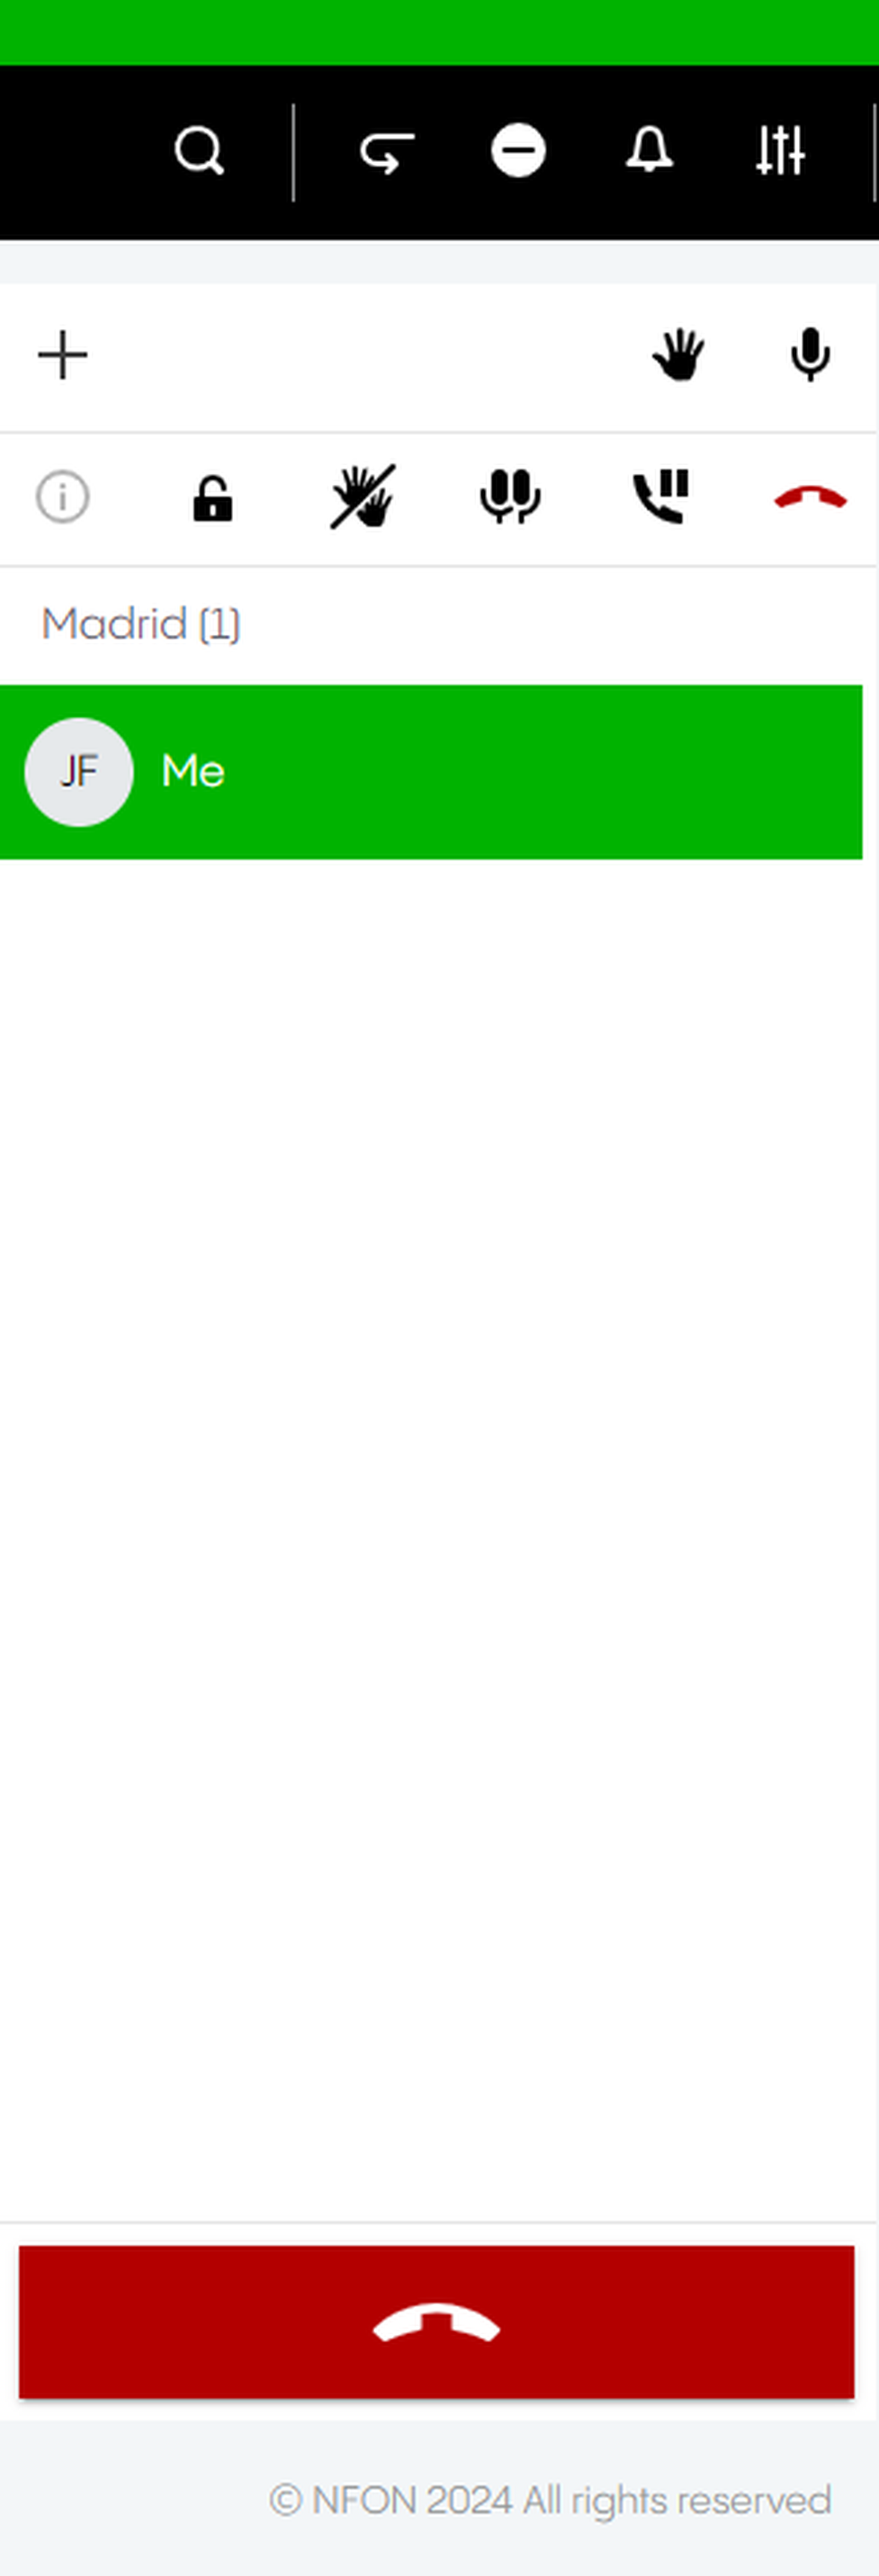
| Add participant | Add participant | ||
| Raise hand | Raise hand | ||
| Mute | Mute | ||
| | Mute all | | |
| Lock conference | |||
| Lower all hands | |||
| Put conference on hold | Put conference on hold | ||
| End conference | End conference |
CRM Connect allows for the integration of various customer relationship management tools into Cloudya and the use of the telephony directly in your integrated CRM systems.
This interconnected solution allows you to save time and work more efficiently.
Here are some of the supported features:
- Direct address book search in the integrated CRM
- Caller details preview
- Click to dial out of web browsers and integrated applications
Please note that the CRM Connect integration is currently available for the Desktop App and on Windows systems only. For more details on compatibility, refer to this overview.
Installation
1. Download the latest Cloudya CRM Connect desktop app here.
2. Under your downloaded files, open the Cloudya installer.
Cloudya and CRM Connect will be installed automatically. Once installation is complete, the Cloudya Desktop app will open.
3. Log in to the Desktop App and open Settings.
After about a minute, CRM Connect will Appear as a new tab under Settings.
4. Click on CRM Connect to start configuring your CRM integration.
CRM Connect Integration Windows
1. Click on Open CRM Connect configuration.
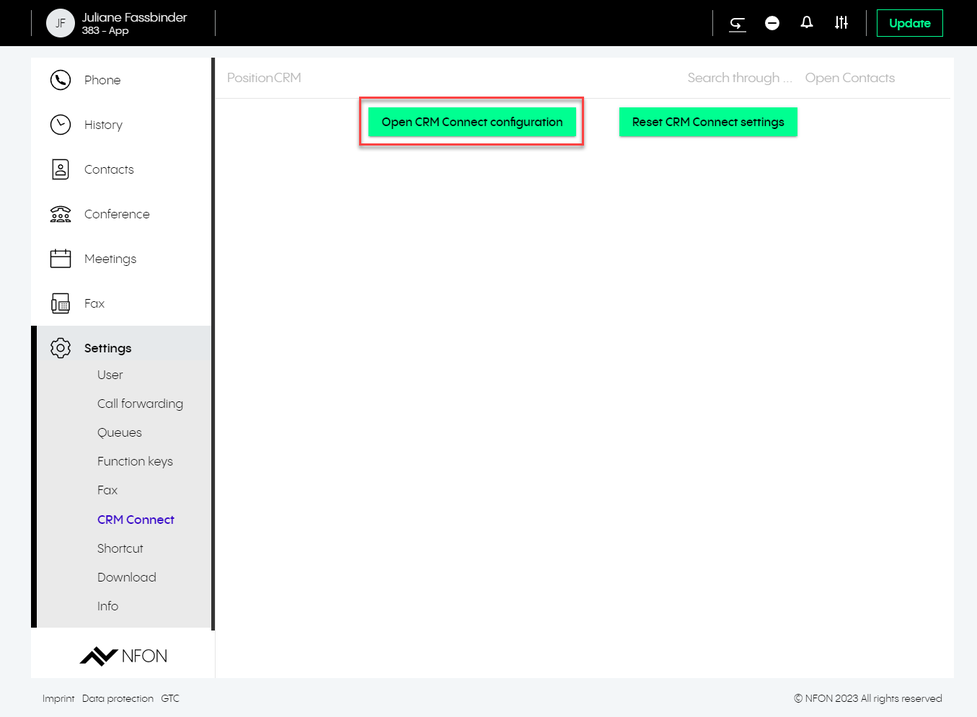
A new window will open in the task bar.
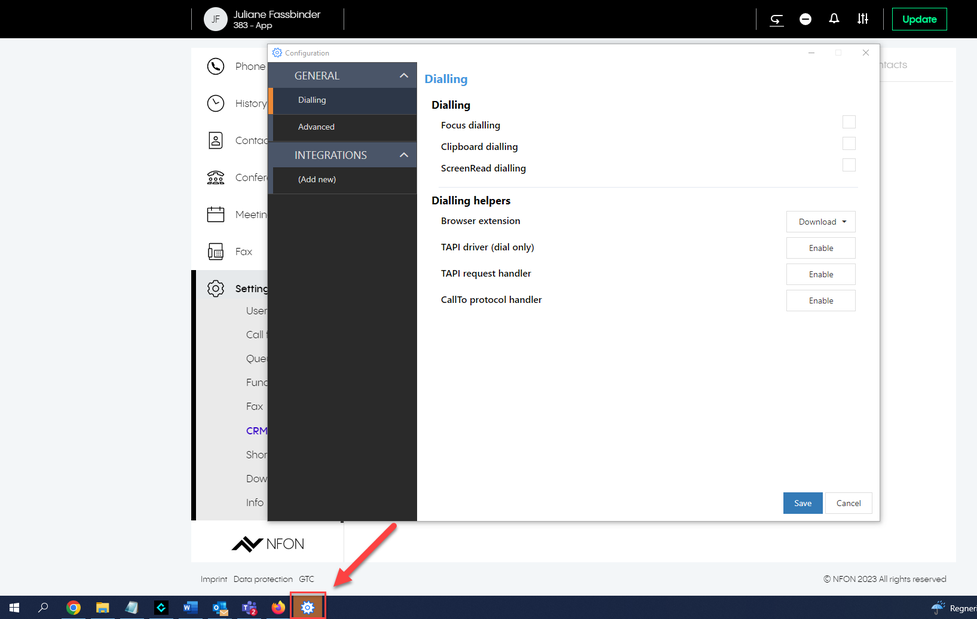
2. Click on the Integrations tab.
3. Click on (Add new) under the Integrations tab.
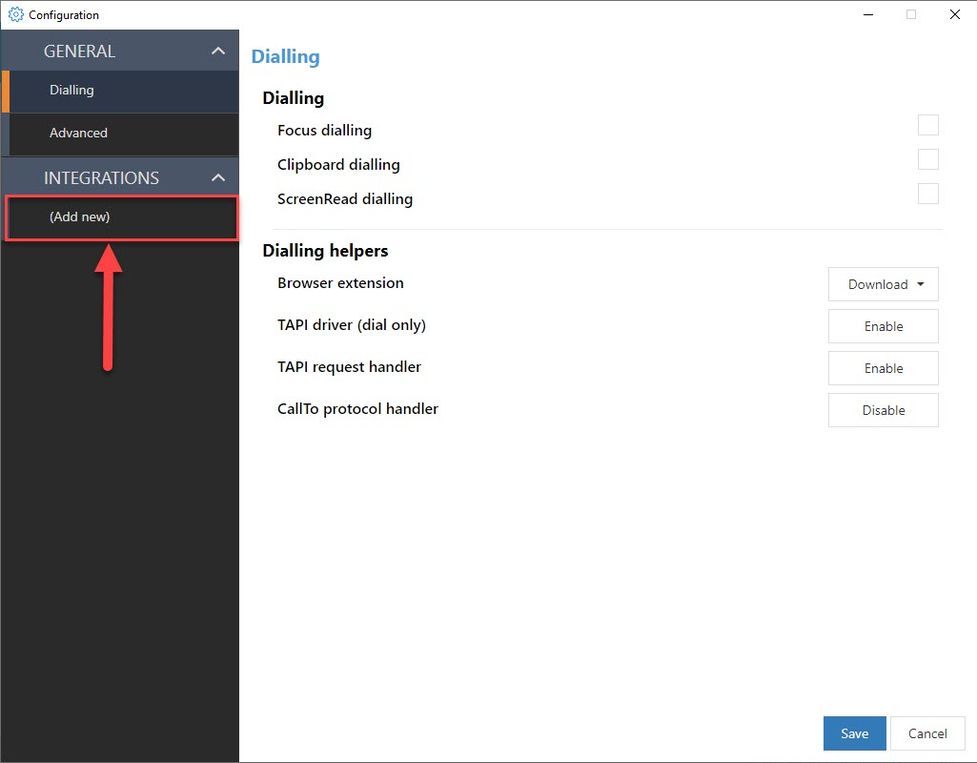
Note that the number of applications displayed in the drop-down list varies according to your licence model.
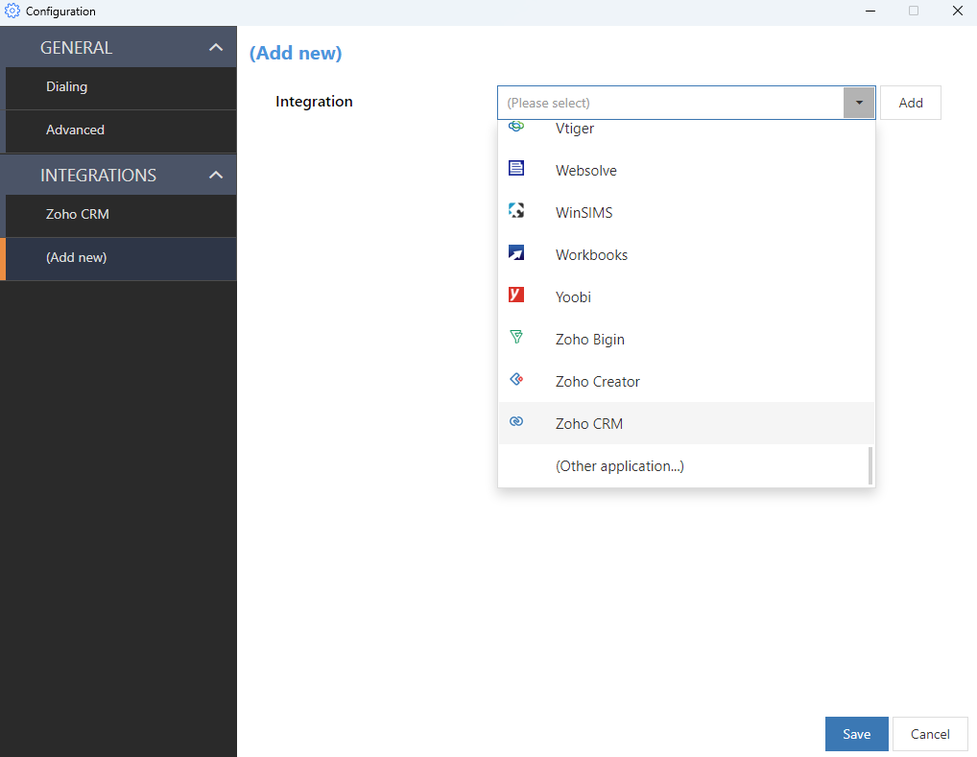
4. Click on the Integrations drop-down menu.
5. Select the CRM application you want to integrate.
6. Click on Add.
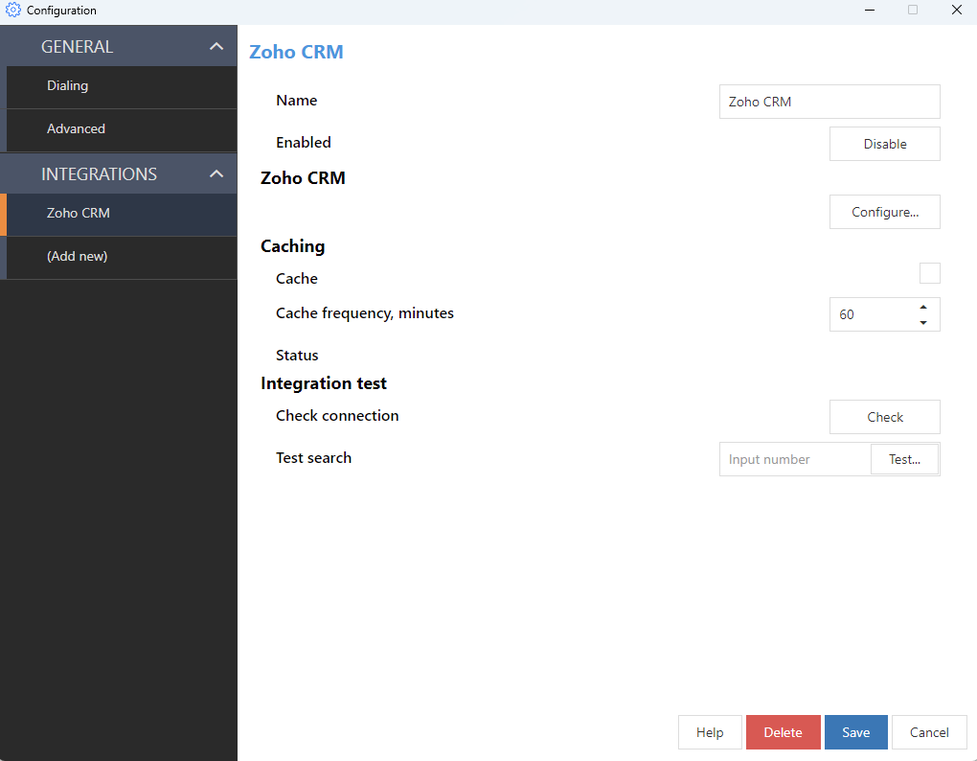
A configuration page will open.
7. Enter the remaining settings according to the page dialogue.
8. Click on Save to complete the integration.
Click on Cancel to cancel the configuration of a new integration.
Click on Delete to remove a previously configured integration.
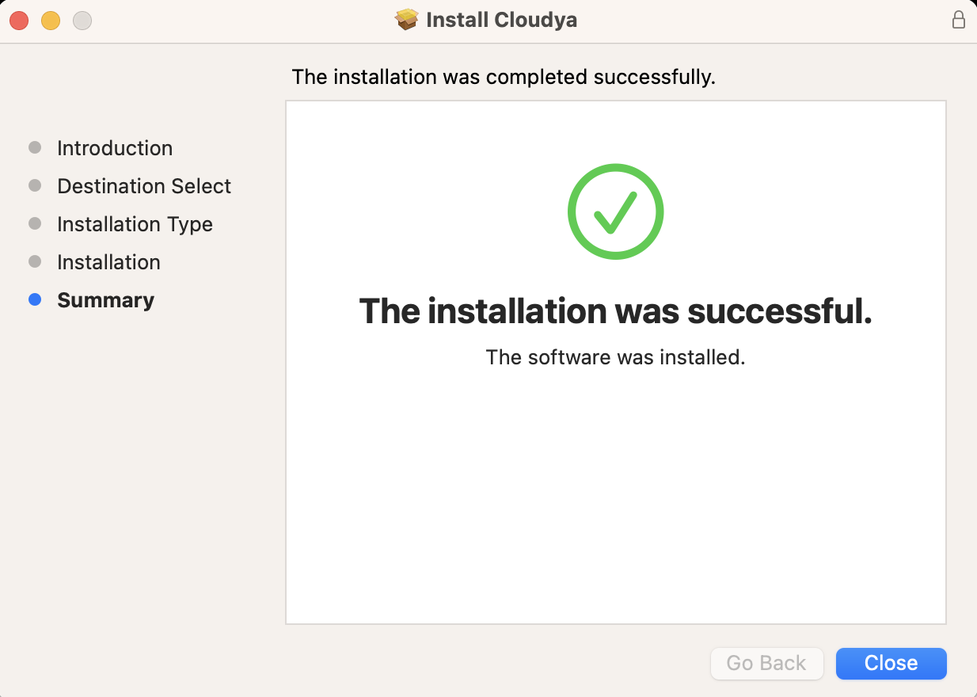
Installation Mac
1. Download the latest Cloudya CRM Connect App for Mac: https://www.nfon.com/en/service/downloads
2. Open the file and follow the installation wizard.
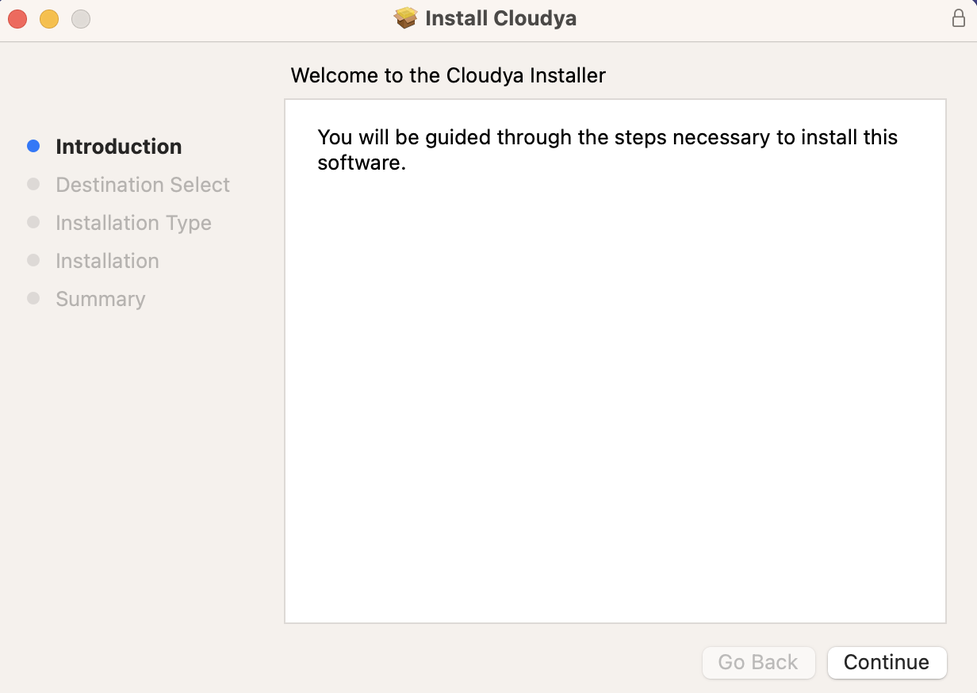
3. The installation wizard requires the repeated entry of the password.
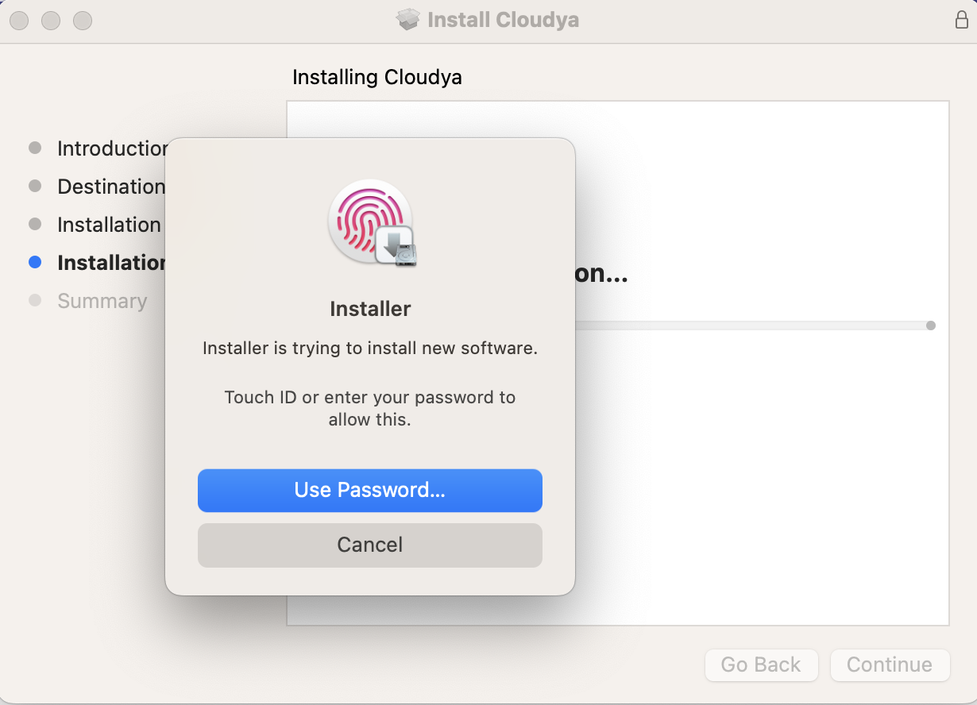
4. After successful installation, the installation wizard can be closed.
CRM Connect Integration Mac
1. After Cloudya has been started, the Integration application also starts.
2. Further CRM systems can be added in the configuration under Integrations.
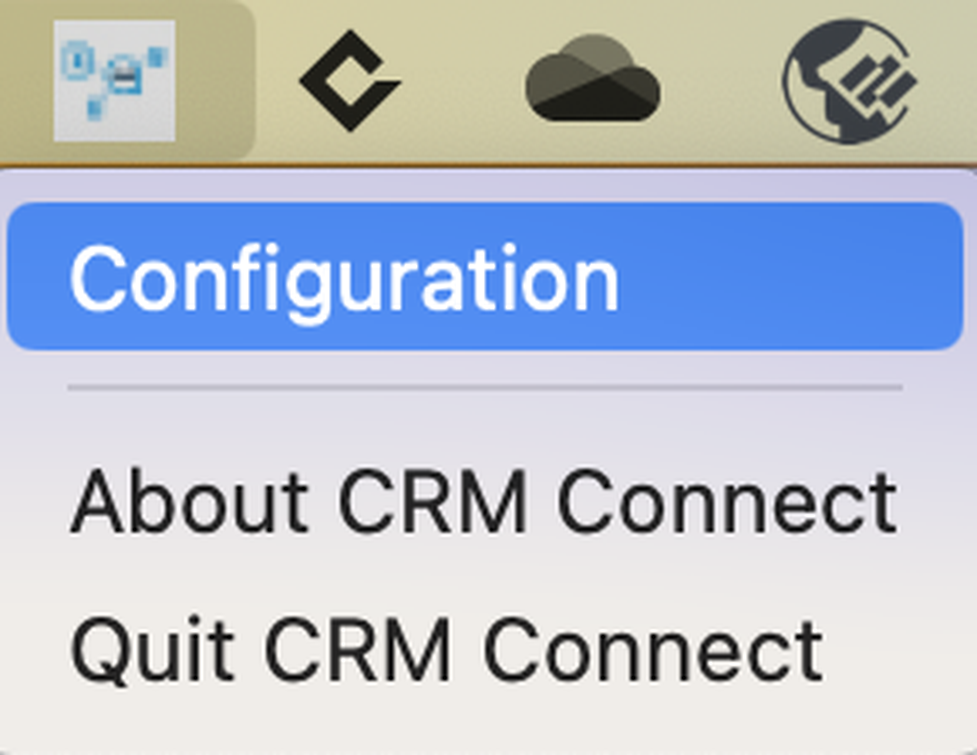
Please note that the number of applications displayed in the drop-down list varies depending on your licence model.
7. A help menu is available for each CRM integration
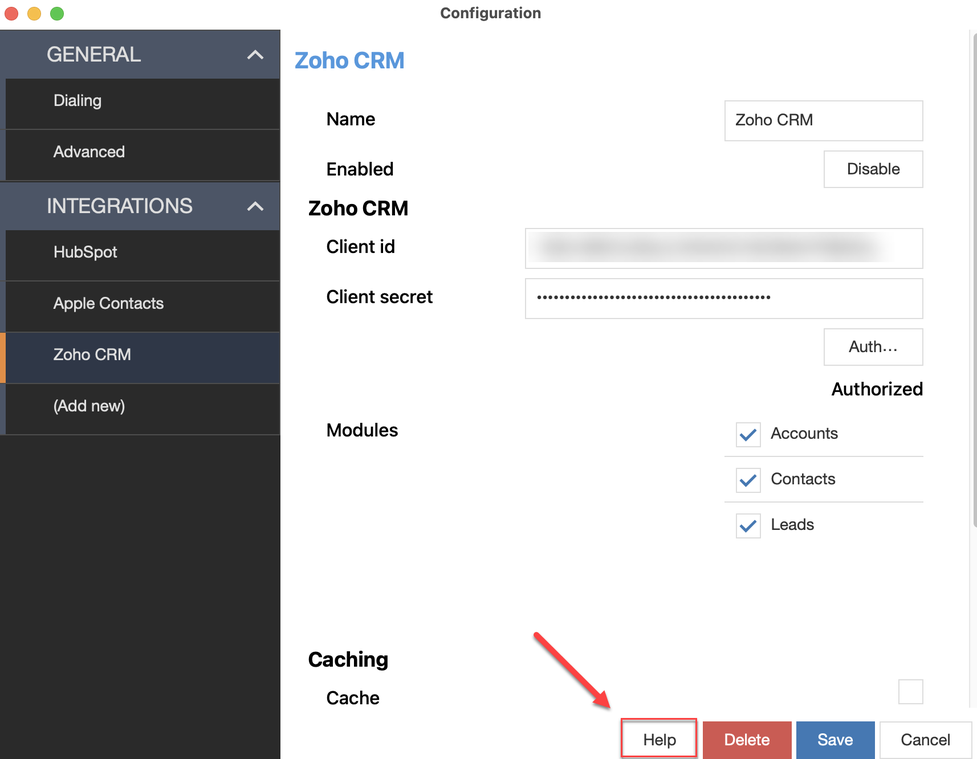
For each CRM system listed, a detailed step-by-step guide is available via the Help button.

Operation examples
Dialling
CRM Connect offers you various outbound calling methods.
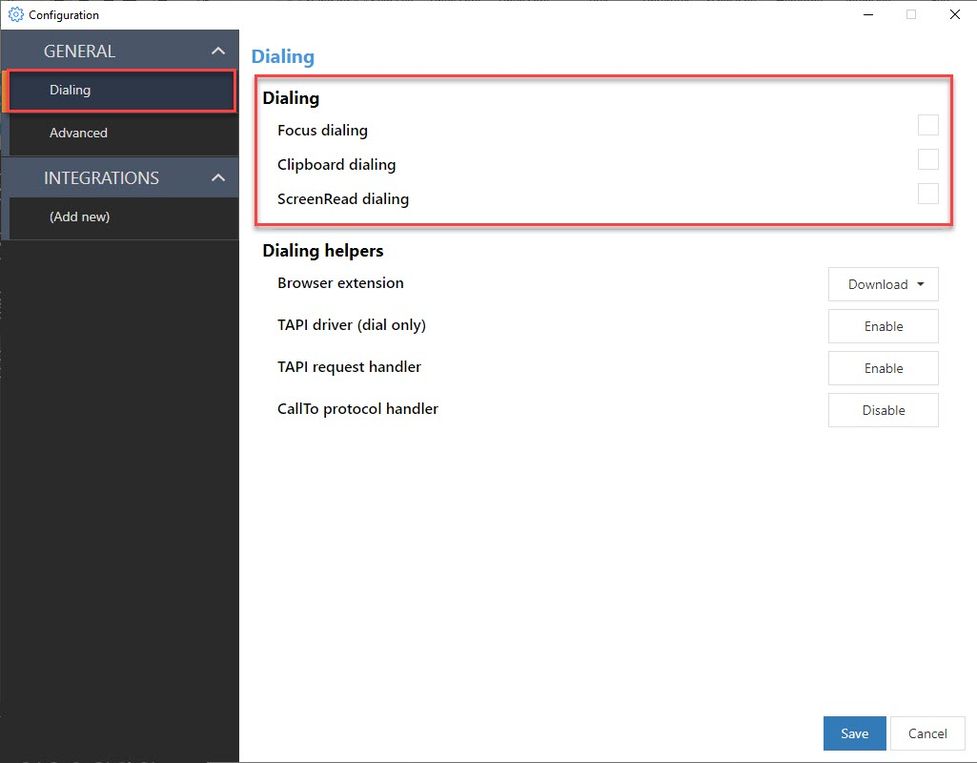
Note that not all applications support all of the dialling methods described below.
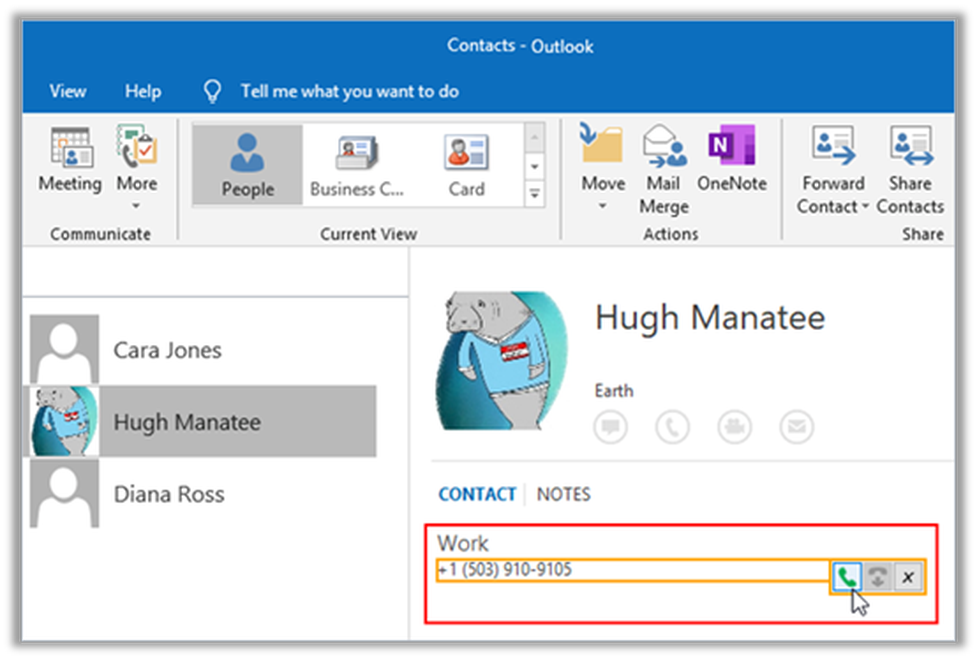
Focus dialling
This dialling methods displays a dial icon for a field containing a phone number.
The field must be selected first or be in "focus" for the dial icon to appear.
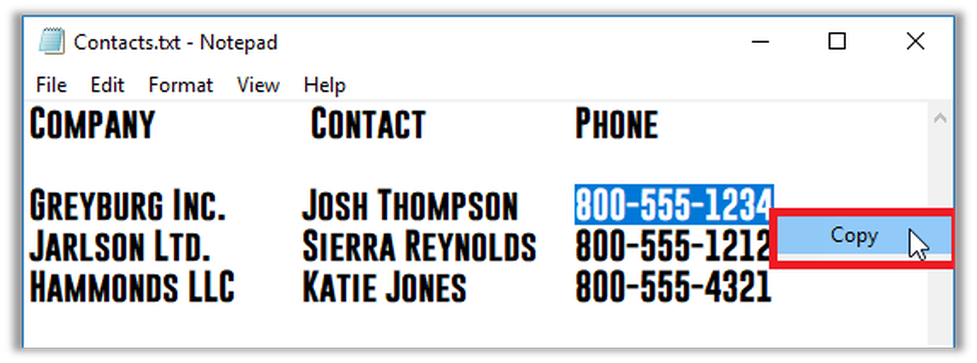
Clipboard dialling
Clipboard dialling enables quick dialling by selecting and copying telephone numbers.
A dial pop-up prompt automatically appears when the number is copied to the Windows clipboard, either by keyboard or by mouse clicks – simply click the phone icon to make the call.
ScreenRead dialling
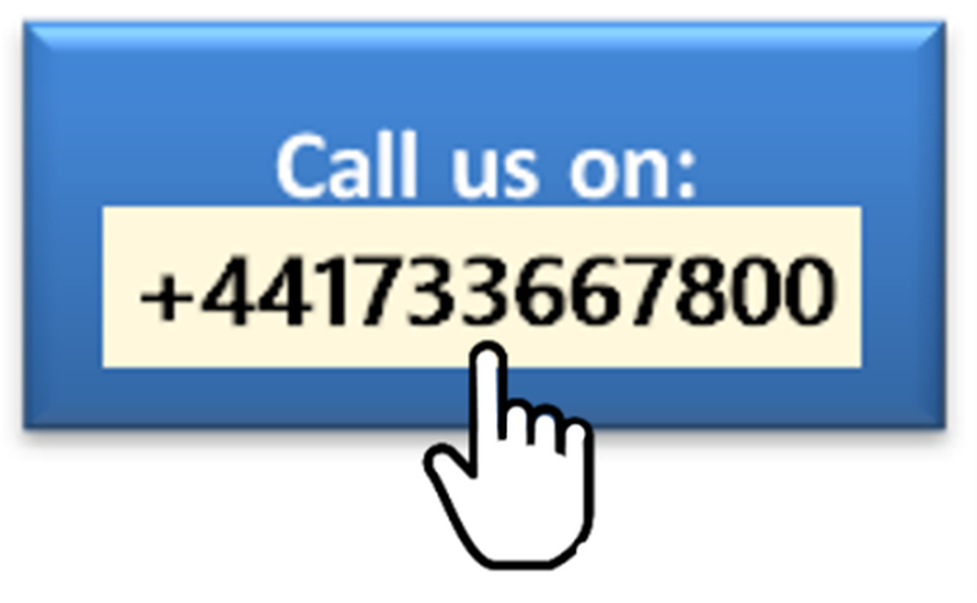
ScreenRead dialling allows any telephone number visible in Windows applications, documents, email signatures or images containing phone numbers to be dialled.
– Position the mouse cursor over the number to dial and hold CTRL+SHIFT to activate the "capture" box.
The "capture" box will automatically convert anything that appears to be a telephone number into a click-to-dial button.
Not every image may be readable due to certain conditions, e.g. digits should be horizontal and must fit within the capture box. Additionally, not every number format will be transformed into a correct telephone numer. Please consult the table below for excamples on detectable number formats:
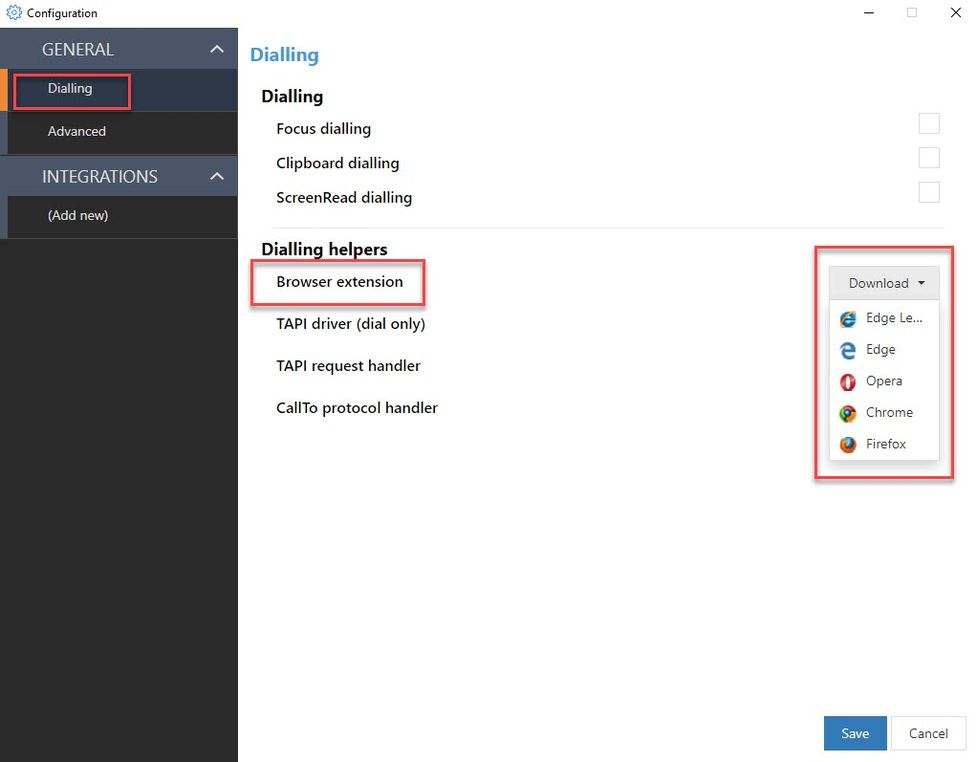
Web Dialling Configuration
Browser Extension
Web dialling enables you to make outbound calls directly from a web browser.
1. Select a web browser extension to install.
2. Configure dialling directly from a web page for Edge, Opera, Chrome or Firefox.
TAPI Driver
Enable TAPI-compatible application to assist with dialling:
– Enable TAPI driver (dial only), "CallTo" protocol handler, or TAPI request handler.
TAPI driver ( dial only): This option is more commonly used than TAPI request handler, as is the case with CRMs such as Goldmin, ACT! and other desktop-based platforms. This selection is for CRM systems that support TAPI drivers via the phone and modem options on the PC. In compatible CRM systems, such as Goldmine, the UC TAPI driver can be selected from the application to initiate an outgoing call from the CRM system via CRM Connect.
CallTo protocol handler: By enabling this option, CRM Connect automatically recognises the CallTo protocol that is formatted accordingly (e.g. CallTo:[0123456789]) to initiate acall via CRM Connect.
TAPI request handler: This is used far less frequently than the TAPI driver. This feature supports CRMs that make a request to "ialer.exe. There is no configuration within the CRM, but CRM Connect creates a registry setting in dialer.exe to use CRM Connect for outbound calls.
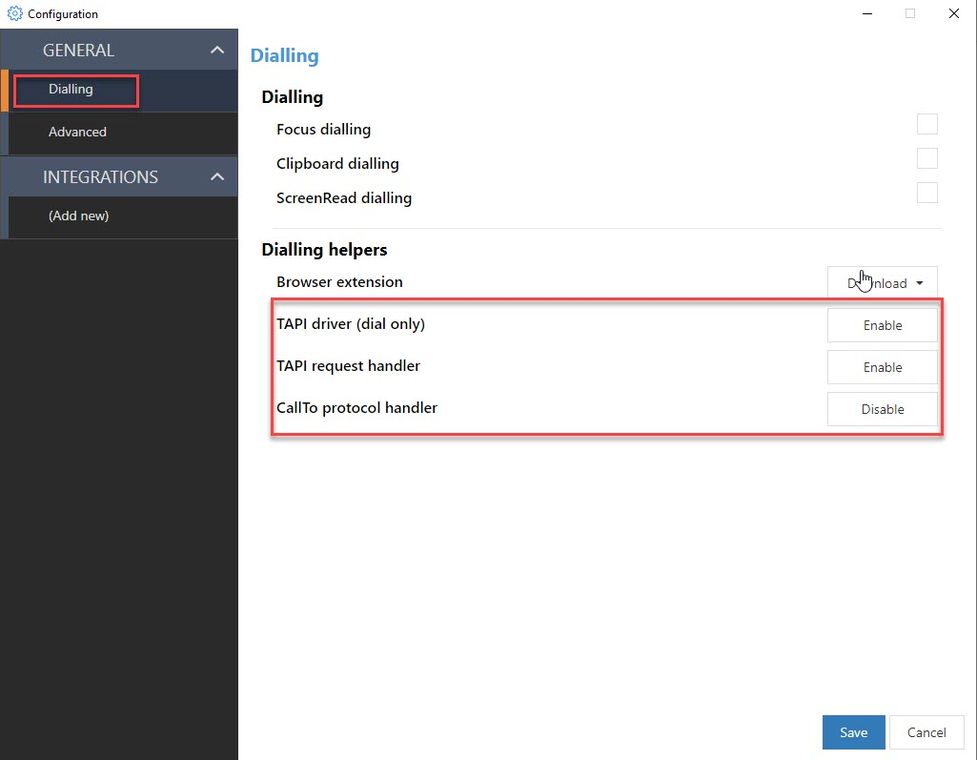
Refer to the manual of the CRM manufacturer of your TAPI-enabled application to configure dialling.
General settings
Under the Advanced tab, you will find the following:
- application-specific version details
- language settings for the CRM Connect menu
- customer feedback option which, once selected, will enable communication of anonymous data to help improve the product
- application logs that contain details about the software configuration
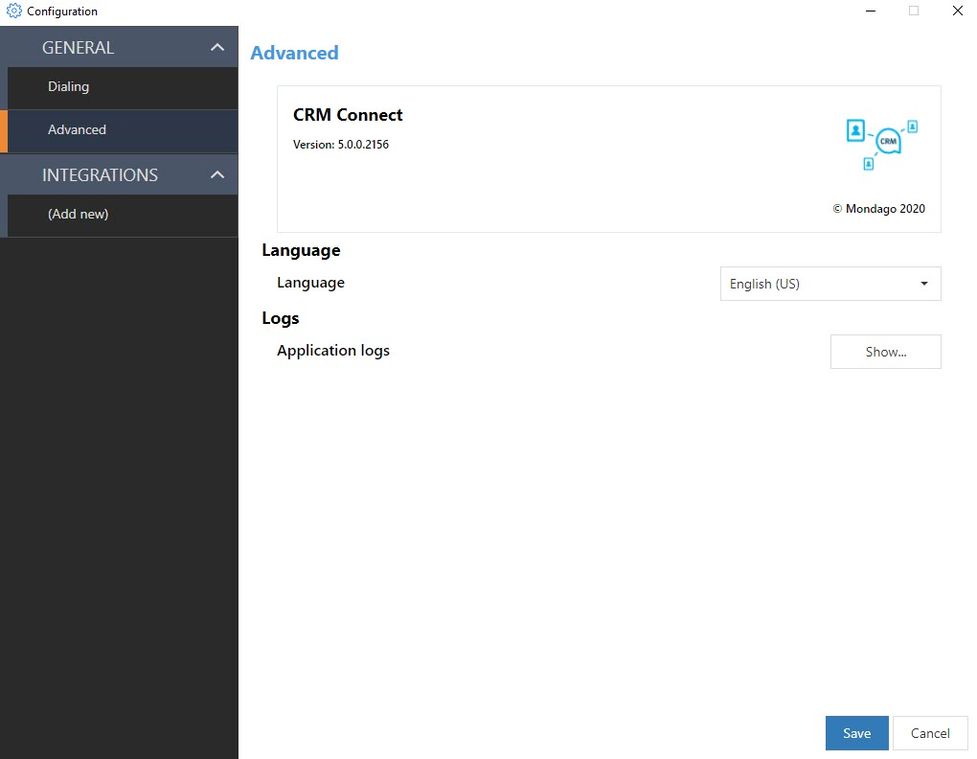
Depending on the initial setup, not all user information will be displayed.
No content available.
Presence information
Presence information is currently reflecting the line state.
Line state is the telephony state of your phone and shows whether the phone is
- offline (telephony line is not connected),
- idle (phone is online but you are not in a call),
- ringing,
- in use (you are in a call).
The 4 states are telephony states.
Here are the Presence icons visible in the apps that reflect the line state and your availability:
 | Available: The user is logged and is idle |
 | Line in use: The user is currently in a call |
 | Idle line state: The user is currently not logged into an application, however the line is idle since e.g. a user has a deskphone or a mobile app installed |
 | Do not disturb: The user does not want to be disturbed. No notifications will be displayed and all incoming calls' destination will depend on the settings in the call forwarding profile. This icon appears when Global DND is activated - see below |
 | Offline: The user is currently offline and not reachable |
Do Not Disturb
There are two Do Not Disturb options available:
- Device DND: The user does not want to receive calls on the device currently being used. The calls will be automatically rejected on the device where device DND is activated.
Please note that this is only applicable for users with the mobility option. - Global DND: The user does not want to be disturbed. No notifications will be displayed and all incoming calls will be automatically rejected on all devices. Global DND will be visible to all users within the organisation.
Note
When activating Global DND, the call's destination will depend on the settings in the call forwarding profile.
Cloudya > MS Teams
The following shows you how Cloudya states are displayed with MS Teams states:
| In use | In a call |
MS Teams > Cloudya
The following will show you how MS Teams states are displayed with Cloudya states:
|
|
In a call
In a call, out of office
| | In use |
This information concerns users with admin permissions!
Please note that the extension management is currently partially performed via the administration portal.
Creating a user via the administration portal
Create an extension for the new user via the administration portal.
Find further information on how to create an extension in the administration portal manual.
As soon as you have created the user via the administration portal and have an extension number for this user, the user can be created in the system configuration of the app. The extension number from the administration portal needs then be connected to the user in the system configuration of the app.
Creating a user via the system configuration
As an admin user, you can add new users to the application and define their permissions.
- First, switch to the system configuration. Go to the app menu and click on the button "Switch to system configuration".
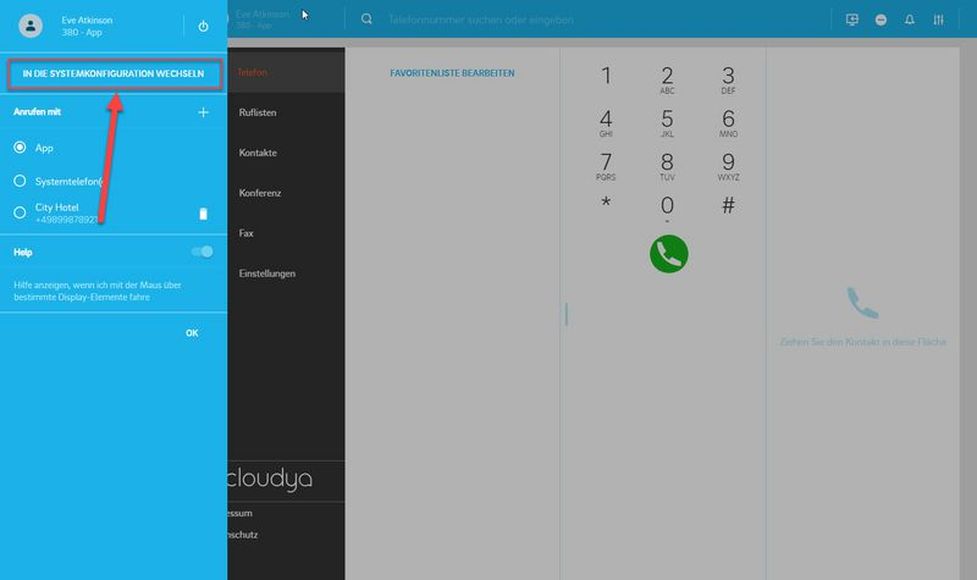
- Re-enter your password.

You are now in the system configuration.
- Go to the user tab.
- Click on the plus icon on the right.

- Fill in the user information such as name and e-mail address.
- Enter the extension number defined in the administration portal
- Set user's permissions.
- Click on save.
The user is created.

- If you wish to edit an entry, you can do it via this view.
- Click then on save.

Please note that after a new user has been created, they will automatically receive an email where they will be able to set their own password.
Where can you get help?
You can use various sources for help concerning your issues:
| Komro GmbH | Am Innreit 2 83022 Rosenheim Tel.: + 49 8031 365 7575 www.komro.net |
| centrex.komro.net | At centrex.komro.net you will find an overview of all documentation, downloads and portals as well as help pages and further information. |
| Business Customer Sales | If you have any questions about your current contract You can reach our sales staff from: Monday to Thursday from 08:00 hrs to 17:00 hrs and Friday from 8:00 a.m. to 1:00 p.m. under the telephone number +49 (8031) 365-7550 |
| Technical support | If neither the manuals nor the FAQs or other contents of the support website have helped you, you can open a support request by telephone.
|